Showing posts with label Tutorials. Show all posts

Saturday, 4 September 2010

Ribbon Hair Bands

Happy Saturday! Have felt wiped out all day but did pop out to get some new buttons and ribbon for a secret project, and while I was there I picked up some extra ribbon and more buttons for these:

If you fancy making your own here are some brief instructions:

  1. Measure your head, mine was 56cm.
  2. Cut your ribbon, I cut 40cm, you could take away 15-18cm from your head measurement for yours, for kids perhaps 10cm.
  3. Cut a piece of elastic, mine was 12cm, you could take away 4-5cm from the remaining distance around your head, 3cm for kids.
  4. Stitch the elastic to the ribbon using a sewing machine, more stitches = stronger join.
  5. Select some felt/some other ribbon/some buttons and hand stitch this over the join to make it neat. My decoration sits behind my ears slightly so is hidden from the front but visible from the sides.
  6. There you have it, a completed headband!

Will share the rest of the buttons later! Kx

Tuesday, 17 August 2010

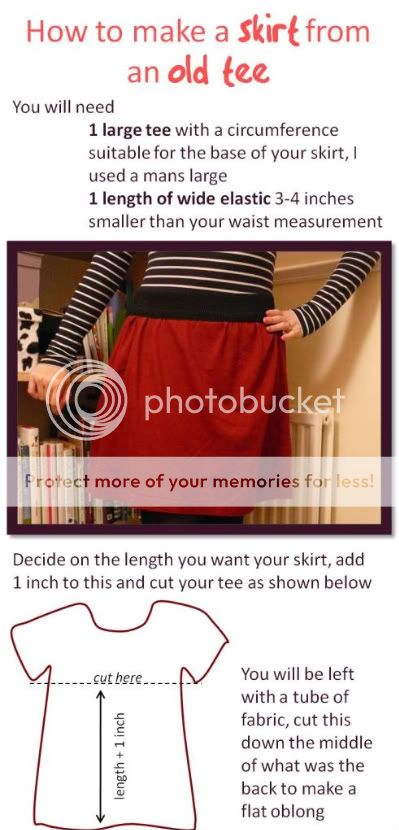
How to Make a Skirt from an Old Tee

Evening all, just thought I would share my projects for the day, I made this jersey skirt from an old mens tee, and now you can do the same! Hope you like, send me a pic if you make it!


Sunday, 25 April 2010

Felt Tulip Garland

Finally finshed a project that has been on my bedside table for a while, a pretty felt tulip garland!

To make your own: Pick your felt colours, I used three layers of felt for each flower, sealing them together with bondaweb before cutting out the flower shapes. I only had enough felt for 4 leaf shapes, but you could do more. Once cut use embroidery thread to sew through the flowers, as they are layered you can hide the thread easily. Tie a small knot and start from the bottom, stitching each shape once at the top to hold it in place. I added small wooden beads for decoration and to help keep the flowers in place. At the top make a loop, hang up and enjoy!


Friday, 2 April 2010

Play Oven Gloves and Placemat

Yet more Good Friday makes (has been a busy day, am finding it tough to do nothing after a hectic week at work)! This is a little request and surprise for my lovely niece (and her creative Mummy) who I keep forgetting to send freezer paper to (I am sorry, will remember this time!). The lucky little girl is getting an amazing homemade play kitchen for her birthday, check out The Crazo Gecko for updates, and I was tasked with making oven gloves! To go with the gloves I had some fun with Amy Butler fabric and made a placemat complete with felt instructions for how to lay the table! I kind of want to keep it but I doubt my dinner will fit on it!


INSTRUCTIONS (more detailed now hopefully)

Both are very easy to make, for the oven mits draw a pattern to match the size of the hand of the child (I had to guess a bit) then cut a front and back (long sausage shapes) the same and 2 ends (U shapes to match the sausage ends). Hem the straight edge of the ends (the flat bit of the U) and place face up on the side that matches/where you would like them, then place the other side face down on top and sew around the whole thing leaving a small (3") gap to turn inside out. Remember to include a ribbon if you want to hang it, turn inside out, sew up the hole and your done!

The placemat has a back (a very old retro teatowel from a carboot sale), sew 2 squares faces together, leave a small gap and turn inside out (then sew up the hole), then use bondaweb/glue to stick down your felt shapes and sew around (I am not very neat but managed to machine stitch this fine). It may be a plan to trace a plate and the cutlery first to get the sizing spot on!


UPDATE: I have entered Sew Dang Cute's Link Party, check out the other submissions below!

UPDATE: I have also entered 'The Idea Room's link-me-up event, check out the other entrants here:

Photobucket

Sunday, 21 February 2010

Felt Rose and Union Jack Pillow

Hello! I have been stuck in bed so I have been passing the time making felt roses (see The Purl Bee for instructions) which I have made into a pillow! I also had a go at making it a friend in the form of a fun Union Jack, it took all of 20 mins, and quite a bit of that was finding the padding I had somehow hidden from myself, see this tutorial if you would like one too!


I tried using the bathroom as a background this time, the colour looks much better - what do you think. Here are the pillows in their new home for comparison, ugly yellowness!

Thursday, 18 February 2010

Satchel Bag Tutorial

I saw a satchel bag in Cath Kidston ages ago which was very expensive but very nice, so I had a go at making one similar today. To make your own you need 2 half yards of your chosen fabric and 1 long or 2 shorter belts (I used 1 for the strap and a smaller one for the buckle).

UPDATE: I have attempted to write a tutorial to show you how to make this bag, it's my first try so please let me know if it works and what you think!